Thanks so much for stopping by to check out the DIY Nightstand project.
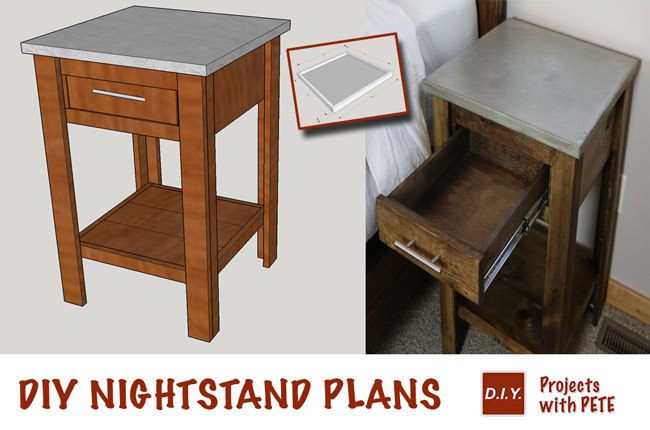
In this tutorial you will learn how to build a DIY nightstand with a concrete top and wood base. This is a great looking piece of DIY bedroom furniture that is fun to build and affordable to make. You can build this a set of DIY concrete and wood nightstands with ease. Just break it down into steps and take one step at a time. I invite you to watch the video, read through this post, and also get the plans here.
Tools Needed
- Miter Saw – I recommend a 12 inch miter saw.
- Table Saw - I recommend Dewalt or Ryobi saws.
- Kreg Jig – The K4 is what I have.
- Orbital Sander – Ryobi makes a nice one.
- Drill
- Trowel - For concrete finishing
- Tape Measure, Ruler, StraightEdge, Pencil
Optional:
Clamps
Circular Saw
You can use pocket holes to connect a few of the boards if you prefer.
Kreg Jig Right Angle Clamp
Speed Square
Approximate Total Cost Per Nightstand: $78
*Approximate Total Cost (Not including tools and supplies you might have like rubber gloves, paint brush, stain, screws, etc.)

If you like the bed frame pictured above, that was a project that I completed a couple of years ago with these plans from Ana White!
Gather Supplies and Download DIY Nightstand Plans
Pick up your supplies. I used pine for this project because it is cost efficient, is lightweight, and takes stain well. You could use any other type of wood. Get hardware for the drawer (14” glides). Get a bag of Quikrete Countertop Mix and any other supplies you may still need that we’ve outlined above or in the DIY Nightstand plans.


Make Your Cuts
Head to your table saw and set your fence to start ripping the boards. Rip all of the 1x6 and 1x8 boards to the varying widths. Then use your miter saw to cut the boards to length. Inside the downloadable plans, you'll find a complete cut list where we've outlined all of the dimensions you'll need to cut. If you don’t have a miter saw you can find one here.

Sand all of the Parts
Now that all of your parts are cut, this is a perfect time to sand everything. Using an orbital sander and 180 to 220 grit sandpaper, sand all of the parts ensuring that you’re getting the fronts, backs, edges, tops, and bottoms.

Kreg the Legs
Set up your Kreg Jig to ½” setting on the drill bit and the jig itself. Separate your left front, right front, left back, and right back leg pairs. Lets grab one pair and get it prepared for assembly. Using your Kreg Jig, screw into the smaller, 1 ½” board, and make three to four kreg holes down the length of the board. These will be assembled into the 2 ½” boards with 1” Kreg Screws.

Assemble the Legs
The smaller, 1 3/4” leg sides always screw into the larger 2 1/2” leg fronts. Make sure to be mindful of left front, right front, left back, etc when assembling to ensure you face and assemble the legs correctly. Apply glue to both the areas to be kreg screwed together. Line up the legs and square it up. Screw 1" Kreg screws into the pocket holes. Clean up any glue bleed-out with a damp rag to save yourself time in sanding later.

Screw Sides and Back into Place
Once you have assemble your leg pairs and have a left front, right front, left back, etc its time to square it up with the back and side pieces. Apply glue to both areas to be screwed together. We need to pre-drill the areas to be screwed in to ensure the boards will not crack. Using 1” or 1 ¼”screws, screw it all together and repeat the steps for the right back set.

Build the Shelf and Install It
The shelf situates on the nightstand base similar to how the 15 ½” back and 17” sides do. The shelf interior is Kreg screwed together and then into the shelf sides. The whole shelf mounts 6" up from the bottom of the nightstand.

Build and Install the Drawer Box
The drawer box is made from the ½” plywood. All of it's dimensions and the complete cultist are outlined in the downloadable plans. This drawer box will all get Kreg screwed together after we drill the pocket holes. The drawer front screws in from the inside of the box. The drawer slide hardware mounts inside the wooden nightstand base as well as on the sides of the drawer box.


Stain the Nightstand and Drawer
I wanted to match my bed frame, so I used Minwax's Dark Walnut stain along with their pre-stain conditioner. Apply the stain with a microfiber cloth and/or brush.

Cut and Construct the Melamine for Concrete Form
The concrete top on the nightstands is 20" by 20" by 1". We need to cut the melamine to that size to build a form for the concrete to be poured into and then cure in. Be sure to keep it clean, any imperfections on the melamine will translate onto the concrete. Seal it around the edges with 100% silicone.


Cut The Mesh
The wire mesh is cut to 18" by 18". The mesh adds support to the concrete and helps ensure no cracking, deformities will occur during curing.

Pour Cement and Mix
In a 5 gallon bucket, pour the about 1/3 of the bag of Quikrete Countertop Mix in and add enough water to make a good consistency. Mix it all up with a small shovel, piece of scrap wood, or mixer.


Add The Mixture to The Form
Fill about 2/3 of the melamine form with your cement mixture. Remember the top of the concrete top will come from the bottom of this form. Work it all in, level it and vibrate it. Add the mesh toward the top of the form and then fill the rest with the cement mixture.


Screed, Trowel, and Level
Its important to screen and level the cement mixture to the top of the form. Use a scrap 2x4 to level and scrape any excess off, working any back in that needs to be. Get everything smooth, this is the last step before curing.


Sand the Concrete and Fill any Holes
After the concrete has cured for at least 24-48 hours, remove the concrete top from the form. Sand the bottom, top, and edges of the concrete. Fill any holes with a cement paste and then sand that all smooth. Prepare it for sealing.


Seal the Concrete Top
Seal the concrete top with at least 3 coats of sealant. Rub it in with a microfiber cloth.

Enjoy!
Enjoy the fruits of your labor! This is a very fun project to make and the collaboration of wood and concrete in the nightstand make for an excellent piece of furniture! Remember to check out the downloadable plans for the DIY Nightstand here.


Remember to check out the downloadable plans for the DIY Nightstand here.